1996-2001 Chrysler Mini Van Noisy Front End
Owners of 1996 – 2001 Chrysler® Town & Country®, Dodge® Caravan® and Plymouth® Voyager® vehicles may experience a creaks, groans, clunks, or squeaks coming from front end when turning the front wheels while stopped, during slow speed parking lot maneuvers or while driving over rough/bumpy roads. Noises may also manifest upon acceleration or deceleration.
The fix is to replace the two front sway bar links, install revised front sway bar retaining nut/washer assemblies and reposition the front suspension cradle rear threaded plate retainers and front brake hose bracket(s).
Since it is hard to pinpoint the exact source of those noises, the following procedures will describe the possible source, diagnostic techniques and the repairs associated with each.
Before you begin the following procedures, test-drive the vehicle to verify the customer’s complaint. Raise the vehicle on an appropriate hoist and perform a visual inspection of the front suspension. Repair or replace any loose, damaged or worn components and test-drive the vehicle again. If the condition is still present, perform the repair procedures listed below.
Service Procedures
(Review safety procedures contained in the ALLDATA® system before beginning)
NOTE: The dampener cannot be installed on DSC equipped vehicles, as it will impair DSC operation.
Procedure 1 - Front Sway Bar Links
Have an assistant apply the parking brake, start the engine and turn the steering wheel in both directions. Reach between the top of the front tire and the wheel well lip and grasp the sway-bar link. Listen or feel for the condition described by the customer while the wheel is being turned. If the condition is present, perform the following repairs.
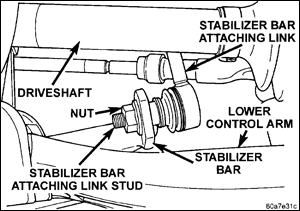
CAUTION: Hold the stabilizer link stud with a #40 Torx bit. Do not allow the stud to rotate in its socket.
- Raise the vehicle on a frame contact hoist.
- Remove both front wheels.
- Remove the upper and lower sway bar link nuts and remove the sway bar link.
CAUTION: Hold the stabilizer link stud with a #40 Torx bit. Do not allow the stud to rotate in its socket.

- Install the new sway bar link (Chrysler P/N 04743454AA). Install the sway bar link nuts and torque to 65 ft. lbs. (88 Nm).
- Perform steps 3 and 4 for the other sway bar link.
- Install both front wheels, use a crisscross pattern to tighten the lug nuts to 50 ft. lbs. (70 N.m) and then use a crisscross pattern again to tighten to a final torque of 100 ft. lbs. (135 N.m).
- Lower vehicle.
Procedure 2 – Front Sway Bar Link Nut and Washer Assemblies
With the vehicle on the ground, grasp and attempt to shake each front sway bar link. If either sway bar link feels loose, check the upper attachments at the strut to determine if either washer is missing. If both upper washers are present, raise the vehicle to check the presence of both lower washers at the sway bar attachment. If any of the four washers are missing, perform the following repair procedure to replace all four nut and washer assemblies.
- Raise the vehicle on a frame contact hoist.
- Remove both front wheels.
- Remove each stabilizer link retaining nut and washer while holding the stabilizer link stud with a #40 Torx bit. Do not allow the stud to rotate in its socket.
- Install revised nut and washer (Chrysler P/N 06505291AA). Tighten nuts to 65 ft. lbs. (88 Nm).
- Repeat steps 3 and 4 for the other three nuts and washers.
- Install front wheels and tighten lug nuts as described in procedure 1.
- Lower the vehicle.
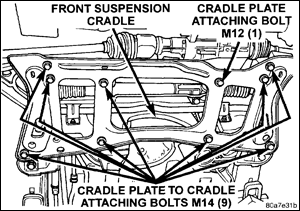
Procedure 3 – Front Suspension Cradle Rear Threaded Plate Retainers
Upon acceleration and deceleration or while driving on rough roads, check for noise from floor pan or dashboard area at the left, right or both sides of the vehicle (may sound like a front seat creak).
This repair procedure involves repositioning the front suspension cradle rear threaded plate retainers and front brake hose bracket(s).

- Raise the vehicle on an appropriate hoist
CAUTION: Loosen only one front suspension cradle rear-attaching bolt at a time. - Loosen one front suspension cradle rear-attaching bolt. Back out the bolt so there is 5/8-inch clearance between the bolt head and the flange of the cradle isolator.
- Use a soft face hammer to drive the rear-attaching bolt up so when the bolt is pushed up by hand completely, the bolt head and the flange of the cradle isolator have approximately 1/4-inch clearance between them.
NOTE: When tightening the cradle bolt, ensure the threaded plate inside the frame rail does not rotate and come into contact with the wall of the frame rail, otherwise another noise source will be created.
- Torque the rear-attaching bolt to 120 ft. lbs. (163 Nm).
- Repeat steps 2 through 4 for the other front suspension cradle rear-attaching bolt.
- Inspect the front brake hose brackets (right and left). If there is less than 1.4 in. (6 mm) clearance between the brackets and the frame-rail, bend the bracket so a 1.4 in. (6 mm) clearance is obtained at each bracket.
By following the procedures described above, you should be able to eliminate the majority of noises from the front of a lot of Chrysler mini-vans. You’ll make your customers happy and easily fulfill your New Year’s resolution.
Chrysler® Town & Country®,Dodge® Caravan® and Plymouth® Voyager® are registered trademark names and model designations of Chrysler Group LLC. All trademarked manufacturer names and model designations are being used solely for reference and application purposes.
© 2014 ALLDATA LLC. All rights reserved. All technical information, images and specifications are from the ALLDATA Product. ALLDATA is a registered trademark of ALLDATA LLC. All other marks are the property of their respective holders.


